Sunday 29 March 2015

GUEST BLOGGER - Krisy Podolak - #2

Good evening everyone. Today I have the wonderful Krisy back guest blogging 2 backgrounds with 2 different layouts. 


I hope you enjoy. 

Lydia xxx

------------------------------------------------


Thank you Lydia for inviting me back again.  

Today I am going to share two different layouts using a very similar background.  I want to show by using different embellishments and colours something very simple can look and feel very different.

Firstly, the Background.  I was inspired by the current trend of ink/paint splashes and stamping.  I have this really groovy triangle roller stamp that I picked up in a pack through an online garage sale site.  Until now I have never used it but triangles are in so it was time to break in this bad boy.  Using Stayzon Ink I rolled the triangles on the card in random areas but kept the pattern going in the same direction.  Once I was happy with the triangles, using Heidi Swapp colour shine I spattered colour on to the paper randomly.  I did this by unscrewing the lid and flicking the paint from the tube attached to the sprayer.  Once I was happy, I let this dry.  I repeated this process a second time.  You will never get an identical looking page and you can add more or less depending on how you feel.


It doesn’t look like much at this stage but its all about the layers and the embellishments.

Once the backgrounds were dry, I used one to create quite a feminine layout of my daughter, Poppy and I scrapbooking.  I used the new  Bo Bunny Pincushion  Collection (Bits N Pieces, layered chipboard and Combo Stickers) to create a layered effect around the photo. 


The photo is overexposed in the top corner due to the window being behind us but I just embellished a little more in this area.  I love the photo and it’s the first photo that I can see myself in Poppy so I wanted to use it. The words are from aKaisercraft Chapter One piece of paper that I have been hoarding.  I have quite a few piece of paper that I have been saving for sometime actually a really long time, so my goal this year it to USE my stash

Additional embellishments I used: Twine, Sequins, Flair, Studio Calico Wood Veneer, Stampin Up Stamp, ribbon Bow.

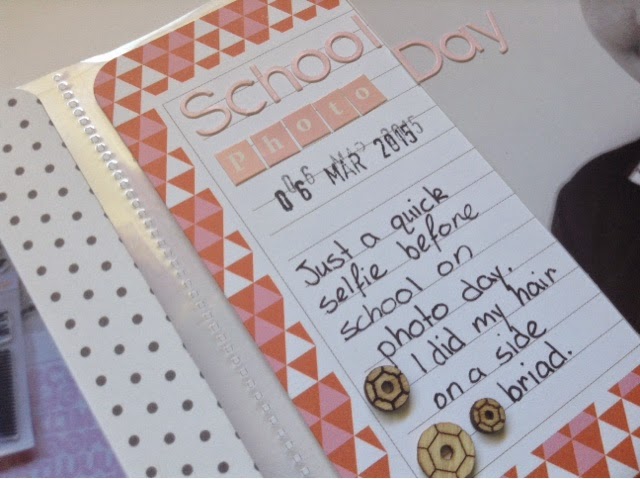
With the second layout I went a lot simpler.  I used the New Simple Stories Say Cheese Collection teamed up with a little Studio Calico Wood Veneer and D-Lish Scraps Glitter Bow I wanted this page to be about the photo.   The layering of embellishments is something new for me.  I haven’t used embellishments like this before but I like the way it looks. The more I look at this layout I think it could have used something more.  Perhaps more layers of triangles over the top of the existing ones so that it doesn’t look so flat? What do you think?


So that’s it.  Two very different Layouts using one very similar background.

 Krisy. 


Saturday 28 March 2015

PL JUNKIES - DT post #2

Hey there Junkies Lydia here to share my Layout.
This weeks layout was when we were on holidays in Port Macquarie NSW Australia so it was a big week with 2 6x8 inserts.
Picture
For theses layouts I used all most of the Maggie Holmes Open Book collection except for the card with the red arrow and the card with the red scollop banner which are both from the Happy Core Kit. I did put the photos in order as that is what I do most weeks.
Picture
Left Side -
My most favourite part of this layout is the top of the Left spread. This is a big post card the you fold in half that was at the reception of where we stayed. So I cut it in half so that it would fit in the 2 4x6 pockets and with those silver Thickers I added a title and I love how this turned out.
Picture
Right Side -
Title Card - I mentioned at the start I used mostly Maggie Holmes Open Book Collection which as gold in it but I really wanted to use these gorgeous silver Thickers.
I had seen a lot of people sewing on their PL cards lately (which I have always wanted to do), so I got my sewing machine out and sewed together layers of tissue paper and patterned paper. I also found the the sewing worked better if I didn't adhere the layers together before sewing.

As I used the silver Thickers I wanted to add some more silver as I had a lot of gold on the layout so I just added some staples to keep the thread from moving.
Picture
Picture
Picture
Picture
Picture
Picture
The first insert front and back is something I have always wanted to do and that I have ticket off my bucket list now.
Picture
Picture
Picture
Picture
Picture
The second insert (left side) is dedicated to a very special catch up with fellow PLJ Design Team member Amanda Horne. I also added a cute title card for my special catch up.

I hope you Junkies are enjoying all of awesome and gorgeous DT work and I look forward to sharing another layout soon.

Lydia xxx

Thursday 26 March 2015

Deer Designer - #6 - Last Post.

Hi everyone. I am sad to say today is my last post as a Deer Designer. I would love to thank Debbie for allowing me this awesome opportunity to be apart of her awesome little shop. This year as been a whirl wind so far with so many awesome opportunities for me and my creative hobby at the age of 14.

So today I thought I would share a Project Life layout. I love documenting my life every week with Project Life. I only started last year and I love how my style has changed.

Here is Week 9 2015 -


Right Side -

Left Side -

I used some of the very cute Project Life Desk Top Collection chipboard stickers.


I also did something a little different and added a shaker pocket but glued each sequin down.

Title Card -


Lydia xxx


Thursday 19 March 2015

GUEST BLOGGER - Michelle Nommensen

I hope you are all having a great day. I am here to introduce the talented Michelle who is here sharing a guest blog post. 

Enjoy.
Lydia xxx

Hi Everyone! My name is Michelle and I am excited to be here writing a guest blog post for Lydia. I love paper crafting and memory keeping in any way, shape or form so, I am always happy to chat about something that makes me feel happy!

A Little About Me…

I am a Paralegal by day. My life revolves around a cool husband, five beautiful daughters, two adorable granddaughters, and handsome GoldendoodleI am an inherent busy body. I work, I play, I create. (Not necessarily in that order). I love spending time with family and friends, creating decadent desserts, playing with pretty paper, snapping photos of just about anything, and working on crafty DIY projects.

I have been scrapbooking for over 20 years. I am a previous consultant for Creative Memories and Stampin’ Up and previousowner of an online scrapbooking and cardmaking kit company, Picture It Made. My husband might say I am “a little” obsessed with scrapbooking but he lets me be excited about it just the same.


Finding Scrapbook Inspiration…

Where do you find your scrapbooking inspiration – blogs, online galleries, Pinterest, craft storesCrate & Barrel? There are so many wonderful, and seemingly endless,places to find ideas and inspiration for any type of scrapbooking project - traditional, digital, hybrid, pocket pages or Project Life. 
Recently, while on a weekend trip to ChicagoI convinced my husband to go into Crate & Barrel. I was in search of a clock for my daughter’s bathroomFound it! Checked out, leaving the store, when these little pretties caught my eye

I knew immediately what I could and would use them for…scrapbooking, of course! (And my guest blog post was born). Back through the checkout line I went. As we left the store, page ideas began to swirl around in my mind – the creative possibilities were going to be endless. These doilies were just a little bit different than the paper doilies you see during Valentine’s Day. To me, they felt more timeless—with a bit of a modern twist.


For my layout, I decided to use the larger of the two paper doilies as a background. The creative process was underway…so exciting!


Step-by-step, my layout came together. Here is my completed scrapbook layout Together featuring these fabulous paper doilies…with a little splash of gold and sparkle to make it shine!


So there you have it. Scrapbooking inspiration can strike anywhere and in the most unusual places. When you are passionate about something, inspiration finds you and that’s a beautiful thing!

What to do when this happens:

• Find your story
• Embrace your inner creative
• Feel free to make mistakes
• Stay focused on the creative
• Push the envelope and amazing things will happen!!

I hope you enjoyed the post! Thank you Lydia for the guest blog opportunity! I had a lot of fun!!

Let your creative shine,

Michelle Nommensen

Blog | Instagram | Pinterest | Google+ | Twitter


Wednesday 18 March 2015

Deer Designer - #5

Hi everyone just here to share 3 tags I made and embellished with the beautiful KaiserCraft collection 'All That Glitter'.


I didn't have any tags in my stash so I jumped on Pinterest to find a tag printable, but instead of printing them I traced them and cut them out on a cheap canvas pad paper from Kmart.


I then got my watercolours out and did some ombré effects on them to co-ordinate with the  'All That Glitter' collection embellishment pack. I also used some bits and pieces of gold from my study also.


And here are some close ups of the finished product. 


I love how these simple and easy tags turned out.
Lydia xxx


Monday 16 March 2015

"Best Friends" - 12x12 Layout

Morning, just here to share a quick 12x12 layout I did yesterday afternoon.


I have been trying to find a way to use these Thickers and thought ok this is the layout to use them on.

I got my stamps and texture paste out for this layout.

I did find this layout is a bit different to me but I do like how it come out.

Have a great Monday everyone.
Lydia xxx

Saturday 14 March 2015

Project Life - Week 9

Today I am sharing me week 9 layout. I still haven't posted week 8 of my holiday because it isn't finished but it will be up hopefully tomorrow.

This week I received my giveaway from Kellie from Give A Girl A Blog which she gave me a whole heap of Studio Calico PL cards and lots of other goodies so I mainly only used those goodies. 

Right side -

Left side -

Title Card - I loved this colour wheel which I got the colour inspiration from for this layout. I used my favourite Amy Tangeraine Journal Thickers and some of the cutest wood veneer sequins from Chic Tags.

This was the very first time I have used a overlay in my Project Life. I also added some stamping of the arrows and the 'State of my mood' card I made into a pocket for a little tag Kellie wrote a note on.

I was soooooooo excited when I saw RuKristin's 'Currently' stamp set. I have always wanted it and thanks to Kellie I now do so I decided because I didn't have many photos of during the week I would do a currently card.

And just a little note of school photo day.


I will be back soon to share Week 8. 

Lydia xxx


Thursday 12 March 2015

GUEST BLOGGER - Krisy Podolak

Good morning everyone. Today I have a very special guest posting here on my blog, Krisy. Krisy is going tell a bit about her self and her chosen topic for this guest post.


A bit about me…My name is KrisyI am almost 32 years old and I live with my husband and our two children, Poppy and Leo in Brisbane, Queensland.  I am currently a Stay at Home mum with a third baby due in the next few weeks.  I have been scrapbooking most of my life but not necessarily in the ‘modern way’.  I enjoy all sorts of crafts but my main love is scrapbooking.  To see more of my stuff you can find me on my blog popleopod.wordpress.comInstagram @krisy28a or Pinterest @krisy5.

Scrapbooking – The Evolution of Style : Don’t Change the Past
I constantly read Facebook comments about people who look back at their past albums and feel the need to go back and redo them.  I ask myself Why?  So many people complain about their inability to keep up with simplified scrapbooking projects like Project Life so why would you go back and redo an album that was clearly a reflection of you and your style at that time?
I have many albums, some coming up to twenty years old and I can tell you that the style of these albums is way different to the ones I am currently working on.  My first album is more of what is referred to as a smash book. This was the style back then.  Then it evolved to somewhat more traditional style. Why would I want to change it?  Not only has the style changed but the quality of my photography has improved and my handwriting but these are all things that make that album unique.  
The other thing that has changed that is reflective in today’s styles is our ability to share ideas and techniques through magazines and social media.  Back then, your style was limited to the one particular party plan company that was dominating the market at the time.  Since then, we are now spoilt for choice not only with physical stores stocking a variety of products designed specifically for scrapbooking and memory keeping but also online stores.  We are now only limited by our imagination and more often than not bank balances not actual products.
While organising my thoughts and photos for this post I came across a page that I did 15 years ago documenting the birth of a friends baby.  We were 18/19 years at the time.  This was the first child for our group of friends at the time.  I took a photo of that page and sent it to her through private Facebookmessage.  Her response to me was I forgot all that stuff.  I think I am going to have to redo that album there was so much inappropriate behaviour I documented in that album.  My words to her…”Don’t change it!  That is what it was at the time.”  At the end of the day we were a group of kids with a kid.  The photos won’t change and the stories won’t either.  “Your right”, was her reply “But…I might do another one to go with it.” I don’t know why!?! 
These are a few of my pages from various albums over the years.  
In the beginning my embellishments were all hand cut from bits of paper.


 I then travelled overseas for a few years.  I didn’t get many photos printed during that time but smashed together cut outs and ticket stubs to document this stage of my life.


Then came the style of cutting photos – I struggled with this one at the time.


And finally today is about one photo, embellishments, mixed media, stamping, paint etc.


So my question to you is, we as Scrapbookers are all about preserving memories, so, why go back and change them? I would love to hear your thoughts.